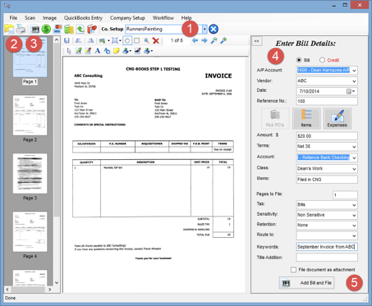
One of the primary features of PSIsafe Books (Books) is to quickly enter bills into QuickBooks and file the document into PSIsafe. This can be done easily and effectively with the bill entry screen. Multiple bills may be scanned or opened at one time and entered in a batch style mode. As each bill is entered and added, the image will move to the next bill in the list. The steps below correspond the red numbered circles (Figure 4):
- Select the company setup for which you would like to enter bills. If there is only one company setup available Books will default to it.
- Either open a document from a previously scanned image or scan directly into Books with your TWAIN compliant scanner.
- Select the bill entry mode by clicking the icon or selecting bill entry from the QuickBooks entry menu.
- Select the appropriate QuickBooks data for the image displayed in the enter bill details panel.
- Click the Add Bill and File button to enter the data in QuickBooks and file the image in PSIsafe.
Adding Line Items to a Bill Entry
QuickBooks allows for the entry of individual line items when a bill is entered. Books allows the same thing by using the Items or Expenses button in the Bill Entry Panel as displayed in Figure 4 (above). Selecting the Expenses item displays a screen (Figure 5, below). All the appropriate data is retrieved from QuickBooks. The user simply selects the correct Account/Amount and any other optional fields (Customer/Memo/Class) and clicks the Add button. Continue doing this until all of the Expense items are added. After the expense items have been completed, click the Done button to return to the Bill Entry panel in Books. Deleting a line item is simple. Highlight the entire row by clicking on the button to the left of the ID field in the grid. Then select the Delete button on the right side of the screen.

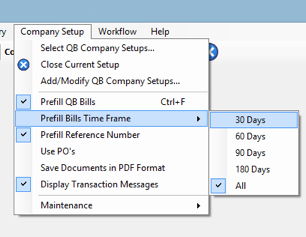
Optional Settings for Bill Entry
There are additional options available for Bill Entry in Books. These are available on the Company Setup Menu (Figure 6). These options control the prefill information available from QuickBooks for the selected Vendor.
Checking the Prefill QB Bills option tells Books to find the last bill used by QuickBooks and prefill the Bill Entry Panel (Figure 4, above) with the information from the last bill from the vendor selected.
The Prefill Bills Time Frame option tells Books to search backwards for a specified date range. The default setting searches the entire history. However, this can be limited (especially if you have been using QuickBooks for a long time) to ensure the data is reasonably accurate and can be retrieved within a reasonable time.
The Prefill Reference number option will pull the last reference number used in QuickBooks and enter it in the reference number field. This is useful if the bills always come with the same reference numbers. Some utility and telephone bills are like this and do not have individual invoice numbers.
PSIsafe Books Guide, PSIsafe Books End User Guide, How to Use PSIsafe Books
Comments
Article is closed for comments.