| version 7.9.x | Download Pending |
Audience
This article is intended for PSIcapture Administrators.
Overview
PSIcapture's Classification Workflow step enables administrators to validate and match specific data to incoming documents in a variety of ways. To better understand Classification, we've broken Classification into three major focus areas:
- Page Validation – When examining forms, administrators need to decide the type of page validation required when processing forms. Page validation in the Classification engine defines separation and page merging functionality.
- Forms Identification – Currently in PSIcapture, administrators can define and classify forms based on OCR match criteria or barcode recognition. This is the most critical planning step, and will ultimately define how pages are classified and documents are created.
- Data Extraction – The ultimate goal in classification is to identify the correct Form ID, and then extract data based on the assigned Record Type. Once a document is classified, and a Record Type assigned, custom data extraction rules can be applied for that particular type of document. Through the use of shared and unique fields tied to Record Types, all the different methods of data population are available. There are several key features that leverage Record Type focused extraction:
- Dynamic Regular Expressions – Advanced Data Extraction (ADE) now allows specific regular expressions to be configured based on the Record Type.
- Zone Profiles – Allow zone OCR-based templates that are linked to specific Record Types.
For more information on the configuration of the Classification Workflow Step, see:
PSIcapture Administrator Guide: Classification Workflow Step Configuration
Global Classification Forms
The Global Classification Form List in the Classification tab of the Configuration root menu allows administrators to define all the characteristics of a global classification form, which can then be copied to/from any capture profile as needed. For a breakdown of the functions of each option on this screen, see the descriptions below:
- Add, Insert, Edit, Copy and Delete - Classification forms are setup through these options. Insert places the form in order below the selected form.
- Move Up, Move Down, Move To... - Change the order of the classification forms by either manually adjusting row by row, or using the "Move To..." to specify an exact position in the list.
- Show Details - Shows a variety of additional details, seen by scrolling to the right, which include Rules, Table Extraction, Description, etc.
- View Usage - A breakdown of the classification form's usage across capture profiles and specific form IDs. Statistics are measured across time periods, selectable from the top "From" and "To" options. Select "Query" when your chosen dates have been selected to display the results.

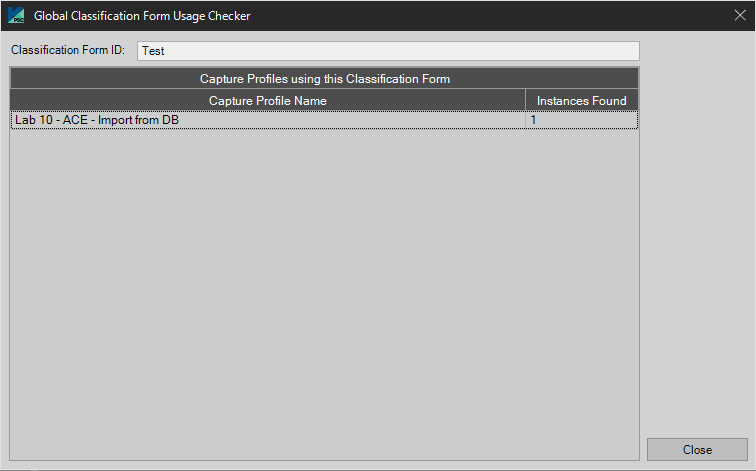
- Capture Profile Usage - This function allows the administrator to check which capture profiles have copied this global classification form to their specific Classification workflow step. When the "Capture Profile Usage" option is selected for a classification form that has been copied from this global list to a localized list within a specific capture profile, that capture profile appears on the list, as seen in the screenshot below:
- Import/Export - Administrators can Import and Export Classification Form Definitions from other Capture Profiles or PSIcapture Installations.
Global Classification Forms Table Display

NOTE: Global Classification forms are not restricted to a single Capture Profile, and can be used across any capture profile or configuration. The table options here will not be the same as those found within the Classification Workflow Step configuration.
- Form ID - This is the name of the form.
- Record Type - A record type could be something like an invoice, quote, purchase order, etc. This is another way to separate your forms.
- Group Type - A group type could be something like manufacturing, tax, HR, construction, etc. This allows the user to group forms together per industry for instance.
- Validated - This shows whether a Form has been validated or not.
At the bottom of the forms list there is an area where the user can see a few statistics.
These statistics tell the user:
- Total Classification Forms
- Validated Forms (what percentage of them are actually validated)
- Record types there are within the Classification Forms
- The number of Groups of Classification Forms
NOTE: Administrators can also choose whether to show if a form has been validated via a checkbox in the far right column of the forms list.

Adding Global Classification Form Definitions
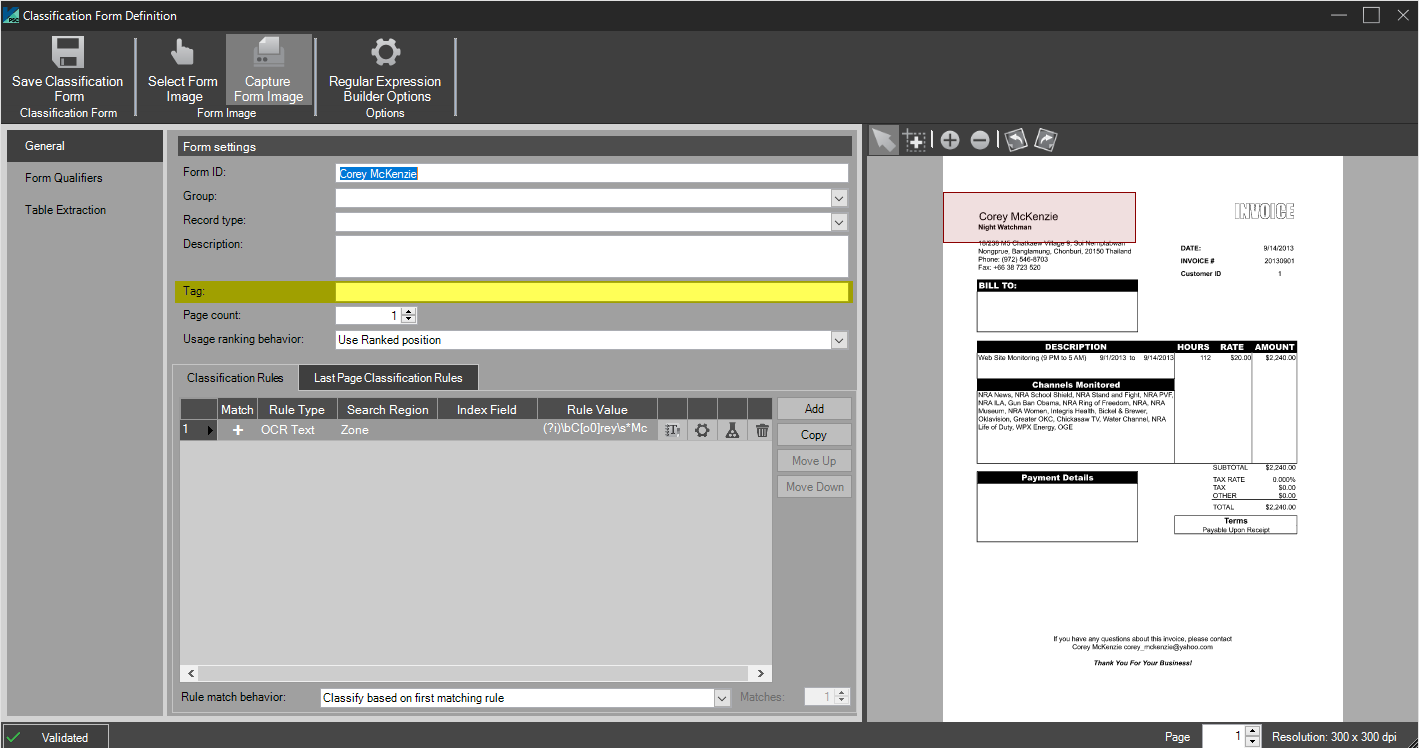
Clicking the Add button will open the Form Definition dialog for a Global classification form. As mentioned above, this form will be available for any capture profile as deemed necessary. Within this configuration interface, administrators have the standard template toolbar which allows them to load or scan a template image, as well as a set of zooming tools.

Form Settings
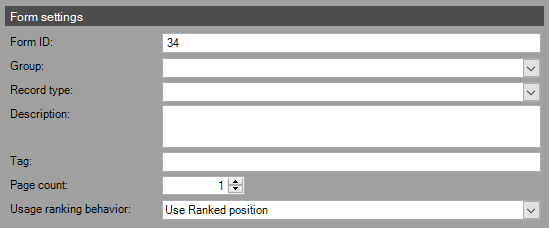
-
- Form ID – The Form ID is the name of the form these characteristics define. Note: This name will be available as a variable, and be placed in a linked index field.
- Group – The Group allows users to create subsets of forms and currently is purely for organization within the configuration.
- Record Type – This dropdown will link to any previously configured Record Types and allows the linking of the Form Definition to the chosen Record. For more information, see PSIcapture Administrator Guide: Configuration: Document Records.
- Description – Allows a user defined description of the form.
- Tag – Tags can be mapped and used to populate an index field. Tags can be used as an additional set of metadata to fine-tune the classification process.
NOTE: "Tag" does not refer to Image Tags in this example. For details on using Image Tag metadata, see: Advanced Indexing: Image Tags or Workflow: Image Tag Output.
NOTE: The Tag value is also available in the following product areas:-
When using ACE in a Classification Workflow Step:
Whether the Tag field is displayed in Standard or Advanced mode, as with other ACE Settings, can be controlled via the "Display Mode Options" > Advanced section of the PSIcapture Administrator Guide: Accelerated Classification Engine (ACE) article: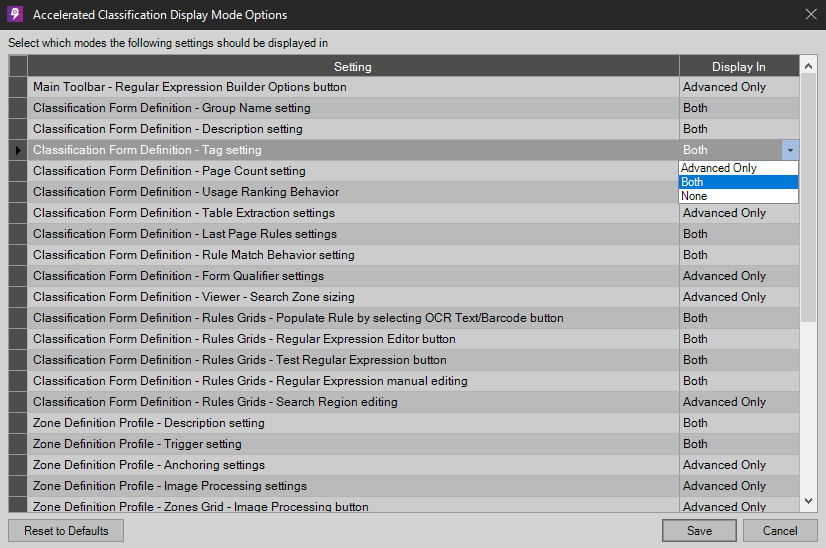
-
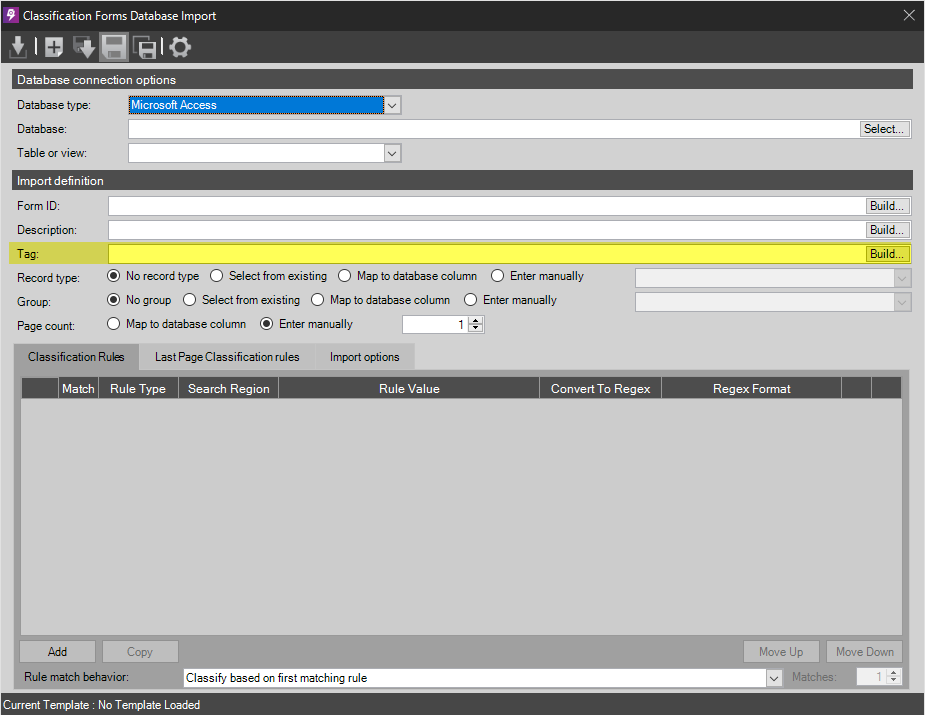
Also, Tags are displayed on the Classification Form Database Import screen:
-
- Page Count – For forms of specified page lengths, this count will be utilized in page validation.
- Usage Ranking Behavior - This option allows users to keep the current use ranked position or override usage ranking settings so that the selected form gets process in the beginning or end of the queue.

-
Use Ranked position - Use the ranking of the list as created by the administrator.
-
Override Ranking and process Form at the beginning of the Form list - Override the ranking of the list created by the administrator and process forms from the beginning of the document list.
-
Override Ranking and process Form at the end of the Form list - Override the ranking of the list created by the administrator and process forms starting from the end of the document list.
-
Tool Icons
 |
When clicked a pop-up window comes up allowing the user to choose what text will be used to identify the Form. |
 |
When clicked the Barcode Recognition window pops up allowing the user to choose what barcode will be used to identify the Form. |
 |
When clicked the application will verify that it recognizes the text or barcode defined. |
| When clicked the edit Regex window pops up allowing the user to edit the regex for the rule. | |
| Deletes the rule. |
Rules
Classification Rules
The Classification Rules section of the module provides the ability to input one or more rules that will define the form. Below are the options:
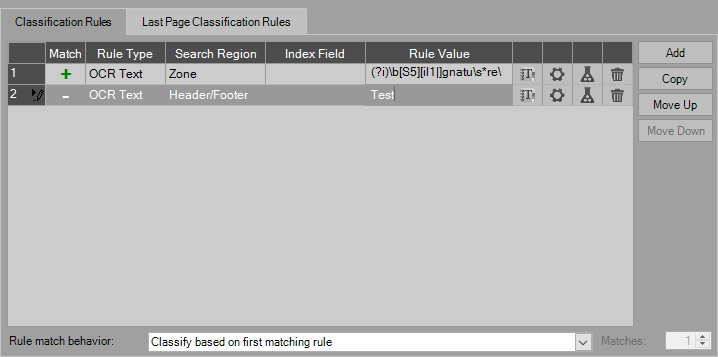
- Match – Administrators can choose a positive or negative match for the rule, and combine them to build a series of rules that will define the form. For instance, administrators may have a form that has “Form OFS 2” on the top, but there are two versions, with different locations for the required data. One form has “Version 2” on the bottom, one does not. Administrators can use a negative rule to make sure the form without Version 2 is properly identified.
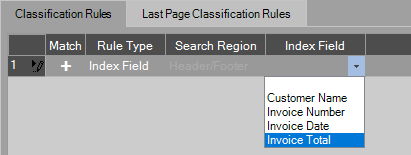
- Rule Type – Currently there are three types of rules: OCR Text, Barcode, and Index Field.
- OCR Text - OCR is used to recognize text within the selected region.
- Barcode - The Barcode recognition engine detects a specific barcode within the selected region.
- Index Field - Link the rule to a specific Index Field value by selecting a preconfigured index field from the dropdown menu:
- Search Region - This option only applies to the OCR rule type. This allows the user to select where on the page the OCR text is searched for.
- Index Value - This allows the user to select which index field to set the value of using the classification rule.
- Rule Value – The Rule Value provides an entry point for a regular expression to match either the barcode value or an OCR expression. This will trigger the classification and setting of Record Type.
- Rule Match Behavior – If administrators have multiple rules, this drop down will provide a means to logically combine them to define the overall match.

IMPORTANT NOTE: Rule Matching behavior applies to all corresponding Classification areas, including ACE and Database Import settings.
Administrators can either choose to:
- Classify based on first matching rule - Classifications will be matched on the first matching rule.
- Positive Classification if all positive rules match and no negative rules match - make the combination of all the positive rules required, with no matches to negative rules.
- Positive Classification if any positive rules match and no negative rules match - make any of the positive rules required, with no matches to negative rules.
- Positive Classification if N or more positive rules match and no negative rules match - specify a minimum threshold for number of rules that must be matched, with no matches to negative rules.
- Custom matching using Rule Sets - Group different Rules into custom Rule Sets by adding Rules via the "Add button". The following extension to the dialog window is added:
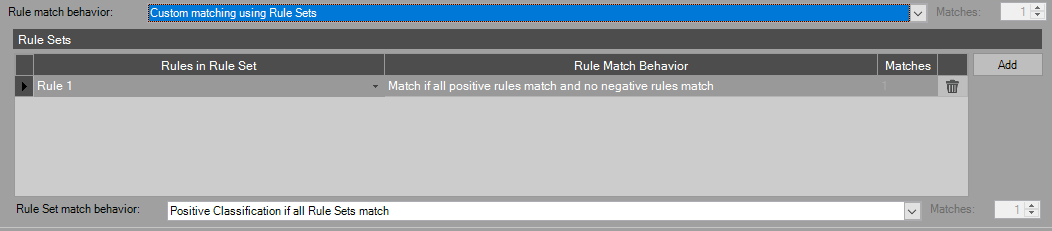
- Rule Set match behavior - Define how the matching process works for your customized Rule set with the following options:

- Positive Classification if all Rule Sets match - make the combination of all the positive Rule sets required, with no matches to negative rules.
- Positive Classification if any Rule Set matches - make any of the positive Rule sets required, with no matches to negative rules.
- Positive Classification if N Rule Sets match - specify a minimum threshold for number of rule sets that must be matched, with no matches to negative rules.
- Rule Set match behavior - Define how the matching process works for your customized Rule set with the following options:
Note: The order of rules can be used to the user's advantage as rules are processed in the order of entry.
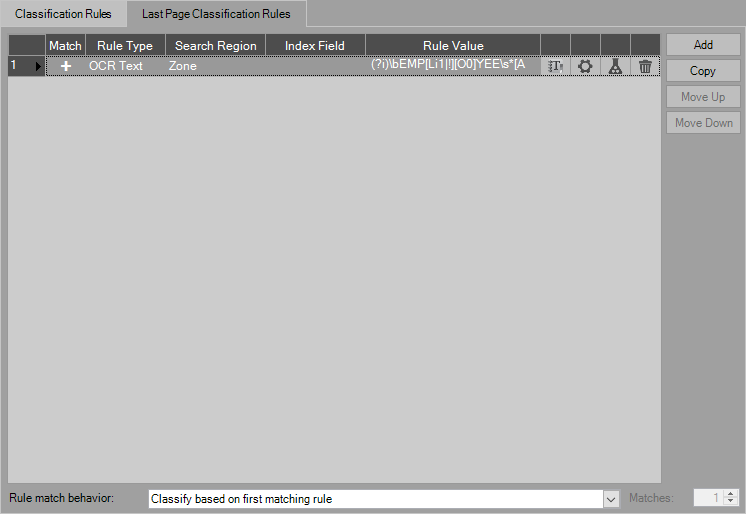
Last Page Classification Rules
If Last Page Rule processing is enabled and a Form Definition contains Last Page Rules, then when that Form is classified, all other Page Validation and classification is disabled and classification will only search for a matching last page for that form. Once is it is found, all pages up to that page will be added to that Form and classification will switch back to normal processing looking for matches for all defined forms. We will also handle the special case where the first page of a Form is also a last page.
If a Form Definition does not contain Last Page Rules, then the selected option under Page Validation will be used (Loose, Strict, None). This allows administrators to mix both types of validation in case they aren't able to use Last Page Rules for all of their forms.
Form Qualifiers
This allows classification based on the page orientation or the size of the form. This can be useful as an additional criteria for defining a form, or can be used by itself with no rules to define a form. An example might be when scanning checks and check stubs, users can assign a record type of Check when certain page size criteria are met.

Table Extraction-Line Items
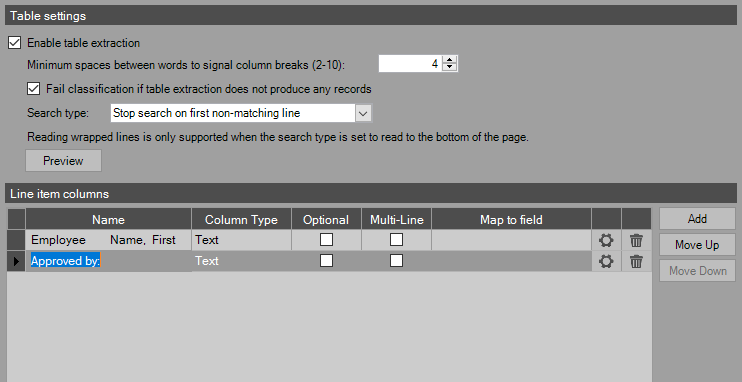
Enable Table Extraction - Enable this option to extract data from tables, sometimes called spreadsheets, which are typically defined by columns and rows in a grid format.
Minimum spaces between works to signal column breaks (2-10) - This option allows the administrator to define the specific table spacing of their unique form to fine-tune the OCR recognition of that region. This number of spaces then serves as a clear delineation to identify the break between columns and rows based on the standardized spaces between characters.
Fail Classification if table extraction does not produce any records - This option allows Administrators to ensure that table data must be extracted in order for the form to pass classification form matching. Use this setting to ensure that the type of form being identified must have table data which is then extracted into records in order to be a successful match. Specify a Search type to determine how PSIcapture will decide if a classification form fails to match if table extraction does not produce any records:
- Search type - Specify the search type for table extraction from the following options:
- Stop search on first non-matching line - As soon as PSIcapture determines that a non-matching line has been recognized via OCR, the search stops and does not use any more processing power and marks the classification form as non-matched.
- Search to bottom of page - This option allows a more in-depth search to ensure there is no table data to be extracted from the entire page. Using the same logic as the above "Stop search on first non-matching line", PSIcapture continues the search for the entire page until it determines there is no table extraction possible.
Preview - Preview the table extraction settings on the current classification form image.
Line Item Columns
This table allows administrators to determine which line items should be extracted from the table of the classification form. Setup each column and its corresponding settings as necessary.
Add - Add a Line Item column definition and its corresponding settings, as seen below:
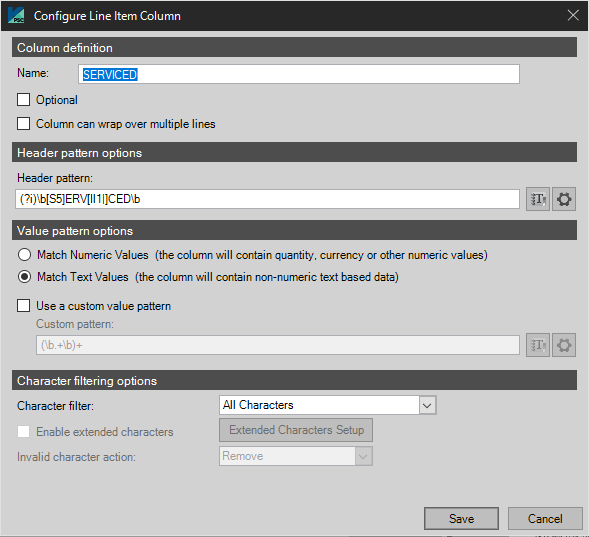
Column Definition
Name - Name a column as needed. A name is automatically generated from the OCR of the original column header, but can be changed as needed.
Optional - Check this box to specify that this column is optional, and not required for classification matching.
Column can wrap over multiple lines - Check this box to specify that the column may wrap over multiple lines in a horizontal direction, i.e. more columns than the originally detected column.
Header Pattern options
Header pattern - The column header pattern is automatically generated from the OCR recognition of the column header upon initial creation. Standard editing of the Regular Expressions and recognition options can be edited via the two buttons on the right of the field.
Value pattern options
Match Numeric Values - Specify that this column contains only numeric values, and only those values should be extracted via OCR.
Match Text Values - Indicate that PSIcapture must recognize alphanumeric text syntax and extract all text-based data.
Use a custom value pattern - Setup a specific value pattern to fine-tune OCR recognition and apply Regex as well as text filtering options to the pattern.
Character filtering options
Character filter - Apply character filtering options to the recognition of the characters in the column and row. These character filters are the standard filters found throughout the rest of PSIcapture.
Enable extended characters - Define a list of extended characters to recognize, including currency symbols, unique syntax, etc.
Invalid character action - Specify one of the following options:
- Do Not Correct - No character adjustments will be applied.
- Remove - Remove the detected invalid character(s).
- Auto Correct - Automatically correct any invalid character(s) with specified replacements.
- Replace with Marker - Replace the invalid characters with a Marker for review at a later time.
Import
Clicking Import button on Classification Module settings will now display a dialog allowing administrators to choose which type of import to perform:
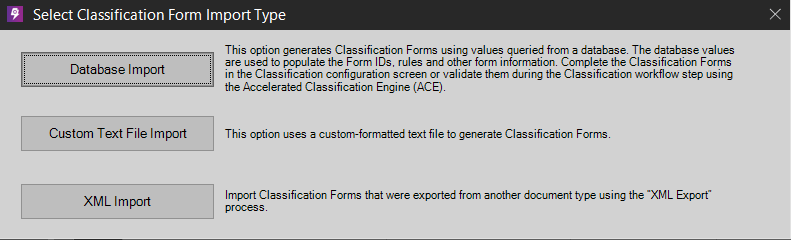
Database Import
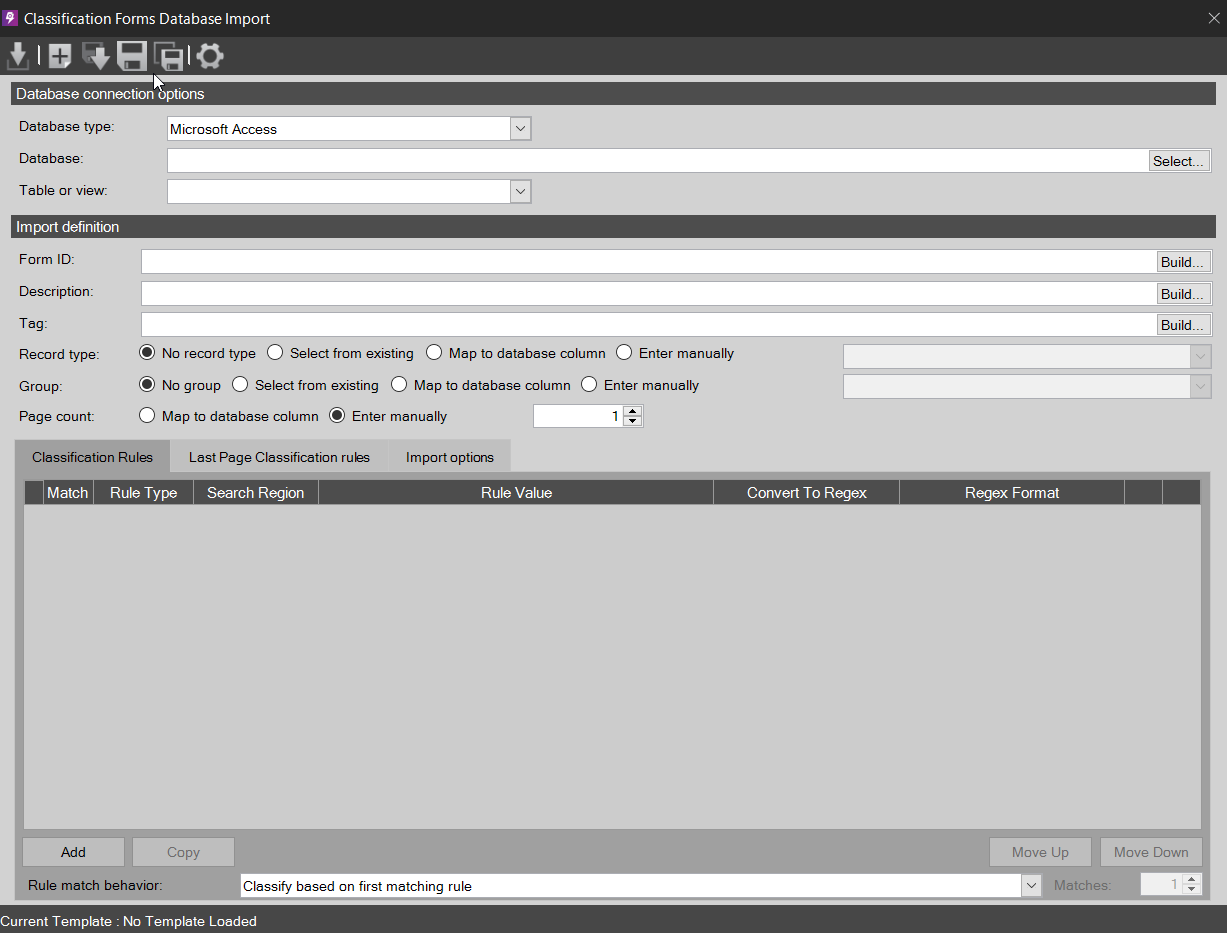
Database Connection
- Database Type - Specify the database type from the dropdown menu.
- Database - Manually build a connection string, or use the "Select" button to pull up the database connection dialogs and browse for an available database, which will then automatically build a connection string based on your input and selections.
- Table or view - Select the table or view applicable to this database import.
Import Definition
- Form ID - This field is required, and should be unique. Form ID, Description and Rules all use the standard Build Custom Value dialog to build those values from different database fields/constants.
- Description - Build a description, which can be based on an index field.
- Tag - Setup a Tag, which can also be mapped to an index field, as in standard classification form definitions.
- Record Type - Set a record type from Existing, Map to a Database Column, or Enter Manually.
- Group - Set a group from Existing, Map to a Database Column, or Enter Manually.
- Page Count - Map this value to a Database Column or Enter Manually.
The other fields are all optional including Rules. Setting up Rules during this step applies them universally across all imported forms. By making Rules optional, it allows the user to come back later and add rules to individual forms.
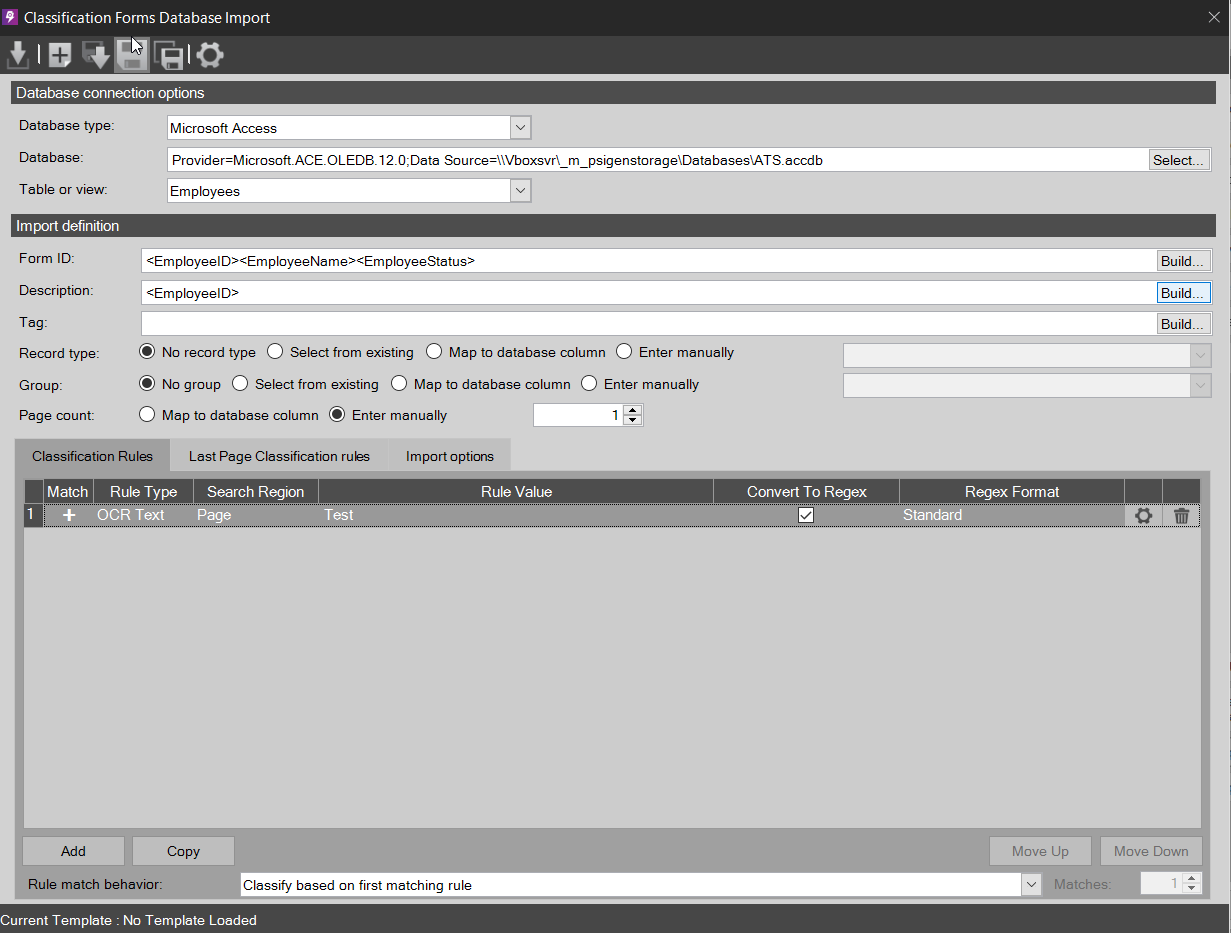
When defining Rules, administrators can either use the values from the table as is, or run the values through the Regex Builder to generate codes necessary. This behavior is controlled for each rule separately using the “Convert to Regex” option. The global Regex Options can be accessed using the Regular Expression Options button.
NOTE: Additionally, as of PSIcapture 7.7+, once "Convert to Regex" is selected, administrators have the further option to specify the Regex Format:
-
-
Standard - Uses the global Regular Expression Builder options to generate the regular expression.
-
Numeric - Format Independent - Generates a Regular Expression that will match any text that contains the numeric digits of the value being used to generate the regular expression no matter what extra characters are also in the text.
-
Rule Match Behavior - This corresponds with the Match Type column available on Classification Form rules and last page rules. See the Rules section above for more information. When rules are created during the import, they will be generated with the Match Type defined on the rule definition on the import template.
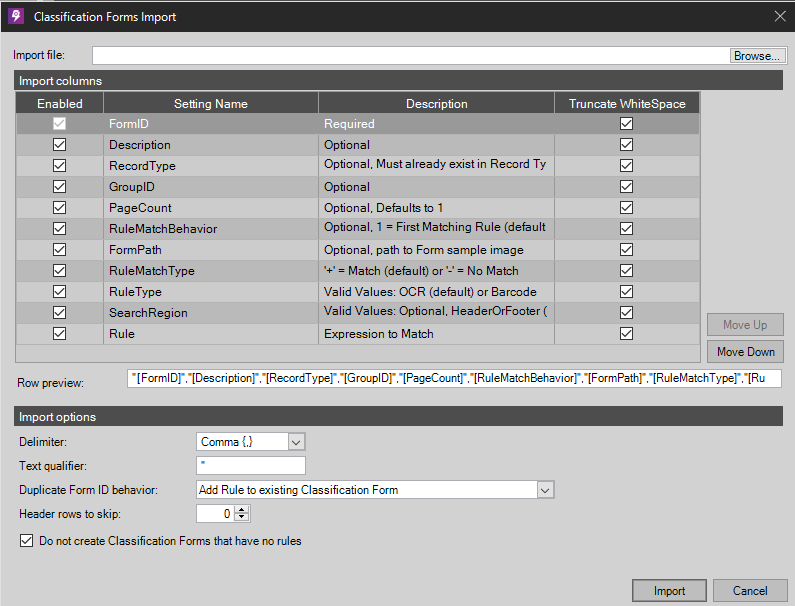
Import Options
- Duplicate Form ID Behavior – Administrators can either skip creation of a form if a duplicate is found or add the rules to an existing form.
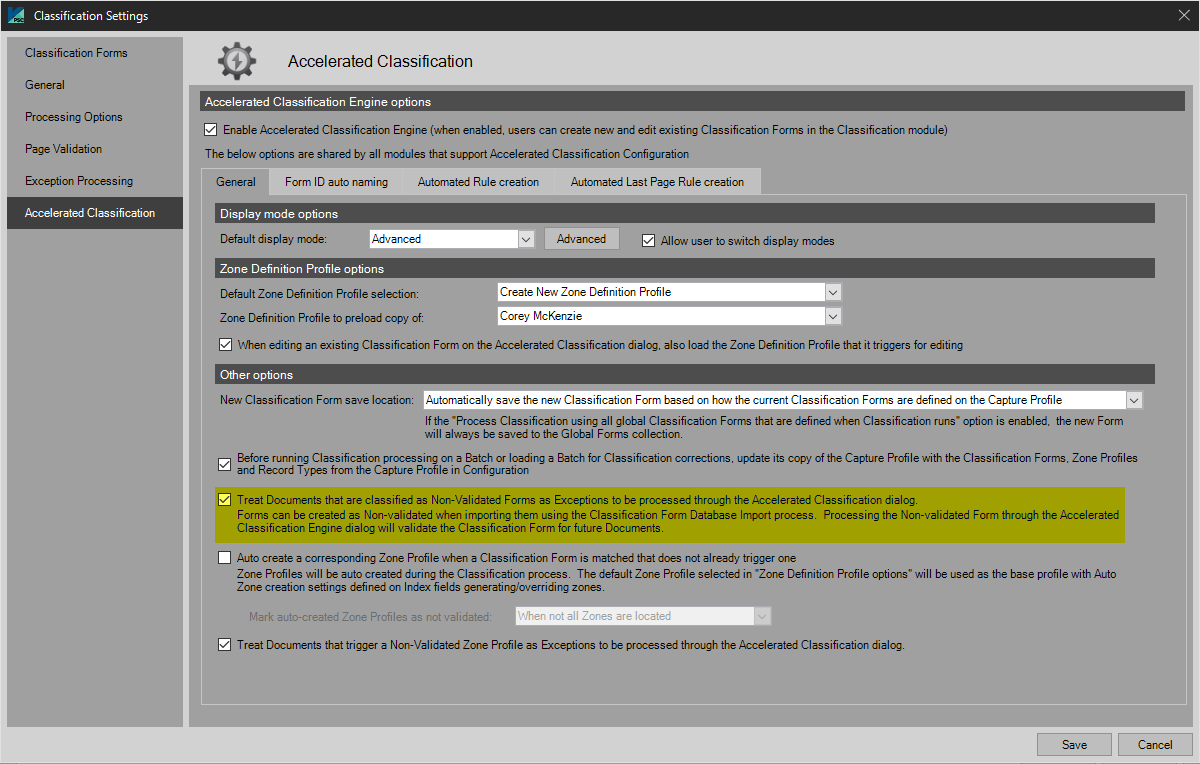
- “Mark Imported Classification Form Definitions as Not Validated….” – If selected, this option will import the form as Not Validated. If the corresponding option "Treat Documents that are classified as Non-Validated Forms..." within the Classification Settings > Accelerated Classification Engine configuration is selected (see screenshot below), then documents that match these Non Validated Forms will be treated as Exceptions to be processed on the Classification Validation dialog. To validate the Form, the user will open the Form in the ACE dialog. When they save out of ACE, the form will be validated for that document, any others in the batch of that type of Form and all future documents classified as that Form type.
- "Do not create Classification Form Definitions that have no rules" - If selected no rule will be added and the form will not be created. The system will warn the user and let them know which form definitions were not made.
Sample Database Import
Custom Text File Import
All administrators need to do is Browse to the location of the text file and click the Import button.
XML Import
This allows administrators to select an XML file that they have exported previously from the Form Definitions export option. NOTE: In versions 6.0.2.x and below this import option is only available in the Classification Configuration settings of the main configuration.
Export
This allows administrators to export an XML file from Classification Workflow Settings.
Comments
Article is closed for comments.