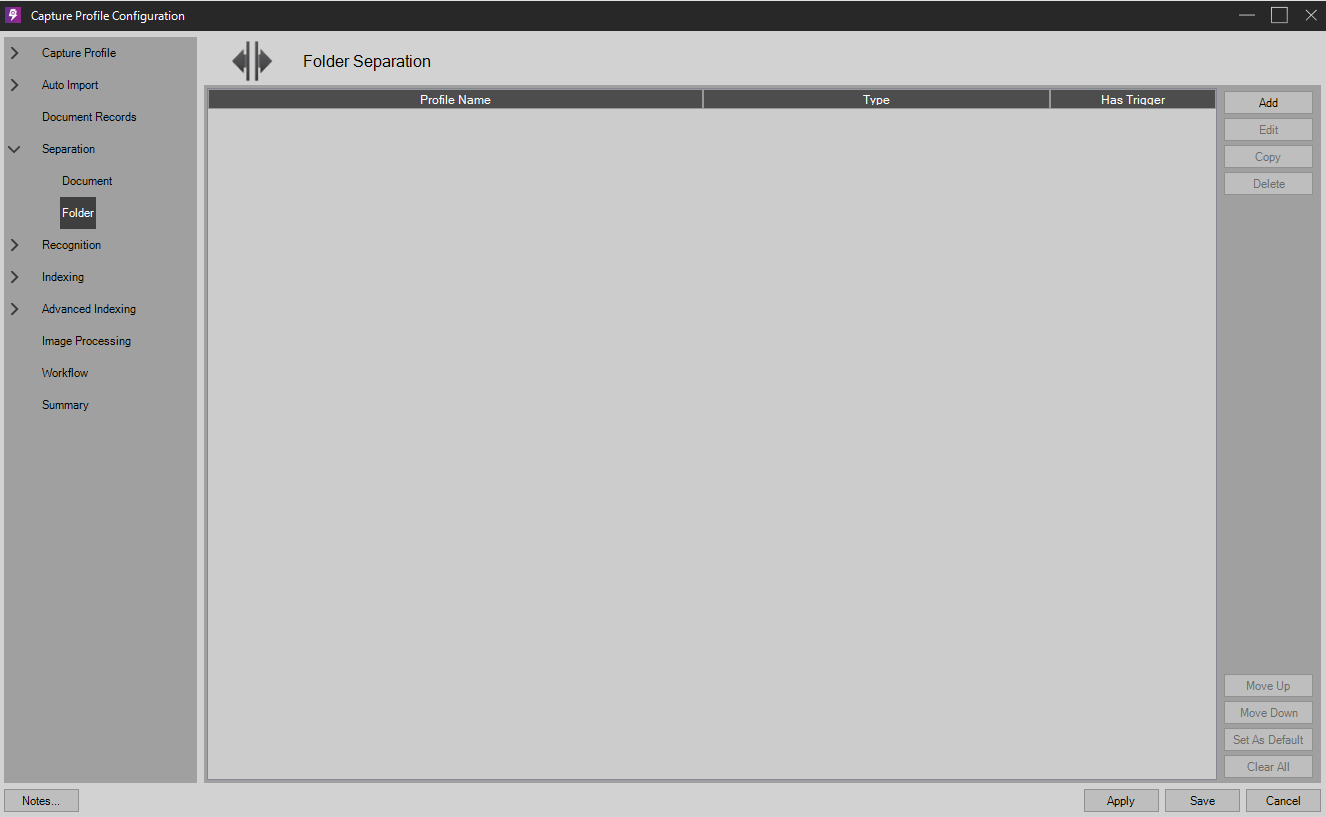
Overview
Folder Separation allows the Administrator to define methods by which to separate folders during Capture. This is a very powerful tool that when scanning many documents at once allows the program to determine when to begin a new Folder occurs. The user can easily create a structured Batch containing multiple folders and multiple documents. Setting up multiple profiles allow the user the ability to change which type of separation method occurs based on triggers.
Profile
Document separation profiles define how scanned or imported images will be separated. Only the first profile in the list is run by default unless a trigger is specified to cause a new profile to be enabled. Once a new profile is triggered it will remain active until the next triggered profile is activated (if any).
Triggers are typically handled by specific barcode values, however there are many options for triggering a separation profile change.
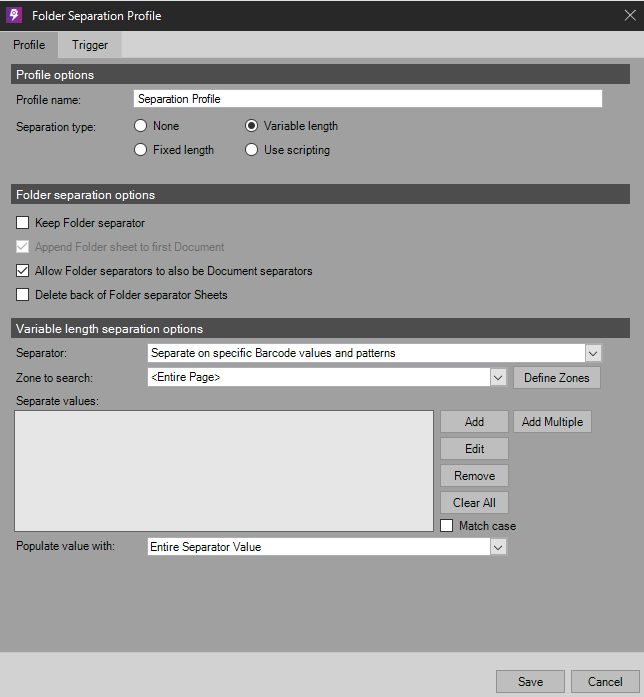
Separation Options
The following options are available for Folder separation:
- None (Default) - The program will not attempt to perform any separation of Folders. All pages that are captured will be placed in one Folder.
- Fixed Length Folders - Select this option if all of the folders that will be captured using this Capture Profile have the same count. When selected, user will be able to specify how many folders there are in total. The program will automatically create a new folder when the specified folder count is reached.
- Variable Length Folders - Select this option for folder/document combinations where a collection of documents need to be associated with each in a folder. In order for the program to group the documents in their own folders, it is necessary to specify the method by which the user wants the folders to be separated. Example: Patient Records where the patient ID is on the folder and it contains multiple documents within the folder which the user desires to categorize separately.
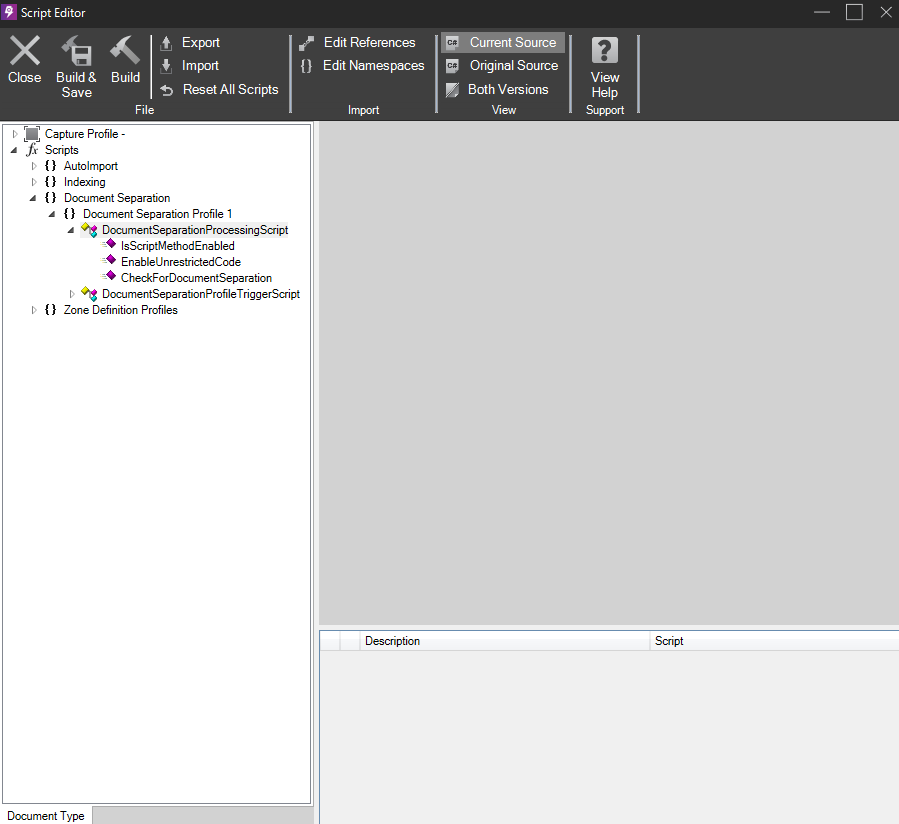
- Use Scripting - Selecting this option enables scripts to be used as method of separation. Select Open Script Editor to begin creating a script. All other options are disabled.
Folder Separator Options
Keep Folder Separator - Save the folder separator image.
Append Folder Sheet to first Document - The saved folder separator page becomes page 1 of document 1 in the folder.
Allow Folder Separator to also be Document Separators - This setting will allow document separator settings to be checked against the folder separation page. If this option is deselected, document separation will run on the page following the folder separation page.
Delete back of Folder Separator Sheets - Folder separator sheets (target sheets) are often single sided. When scanning in duplex mode, the user can chose to delete the back of the separator sheet. NOTE: Blank page detection must be enabled.
Script Editor
When the Script Editor is opened, the scripts for the currently configuration area are displayed by default. For example, pressing the Open Script Editor button on the Auto Import Settings screen displays the scripts for Auto Import by default. However, once the Script Editor is opened, all scripts are available for editing.
For more information on the different options for Separation scripting see our Document and Folder Separation Scripts article.
Edit Script
Select “Edit Script” to begin creating a script.
Scripting
Creating a script involves three steps:
- Adding external references and namespace imports (optional and uncommon)
- Editing script code
- Compiling and correcting errors
For more information on the different options for Separation scripting see our Document and Folder Separation Scripts article.
Variable Length Separation Options
Separator Options
The user may choose from the following folder separation options:
- Separate on specific Barcode values and patterns - Regular expressions can be used to create a desired pattern. If a barcode is read and matches the pattern then separation occurs.
-
Option 1: If the value 990008 exists anywhere in the barcode separation will occur.
-
Option 2: When ^990008$ is entered as the value only a barcode containing the exact string 990008 would cause separation.
-
Option 3: If the user wants to separate on certain positions, the user should use these brackets [] to enter value options. For example if [0-3][a-f] was entered as the value then separation would occur when the first character of a barcode was 0, 1, 2, or 3 and the second character of the barcode was a, b, c, d, e, or f (in that order).
-
-
Separate when Barcode changes - Select this option when scanning documents that contain the same barcode value on more than one sequential page. These documents have ONLY one barcode per page or zone.
-
Separate when Barcode N on page changes - Separation will occur when the Nth barcode on a page changes.
-
Separate on any Patch Code - Separation occur when a patch code is detected on a page.
-
Separate on specific Patch Code - Choose from patch code types I, II, III, IV, VI, or T.
-
Separate on new file (Import only) - Folder separation occurs each time a new file is encountered.
-
Separate on new Data Index file (Import only) - Separation will occur when a new data index file is called upon during import.
-
Separate when child Folder N of selected directory changes (Import only) - Separation occurs when the Nth child folder changes. Example: Set N to 2 if the desired new folder for the document is the value of the second folder level down C:\A007-19D\C57183\
-
Child Folder N - Select the value of the Nth position of the desired child folder.
-
-
Separate on specific Zone OCR/ICR values and patterns - Detecting a user defined word in a Zone or the entire Page will cause separation.
Example: If the user enters “Page 1” into the field, PSIcapture will create a new folder (separation) each time the word “Page 1” is read within the specified OCR/ICR zone. -
Separate when Zone OCR/ICR value changes - Select this option when scanning documents that contain the same value as read by zone OCR/ICR on more than one sequential page and the user desires to separate only when that value changes.
Example: Draw a zone around the “Invoice Number” when processing invoices and it will separate whenever the number changes. NOTE: This will separate when ANY value in that zone changes. -
Separate when Zone OCR/ICR Match value changes - Select this open and specify a regular expression below to search the page or zone for specific patterns and separate when the pattern changes.
Example: Enter the regular expression “\d{6}” and draw a zone around where the invoice number is located. This will search the zone, if a six digit number is located within that zone PSI:Capture will check to see if the number is different from the previous match and separate when it changes. - Separate on any PDF Bookmark - Select this option when scanning documents that contain PDF Bookmarks. Separation will occur if ANY bookmark is found.
- Separate on specific PDF Bookmark values and patterns - Select this option wihen the user would like to separate on a specific PDF bookmark.
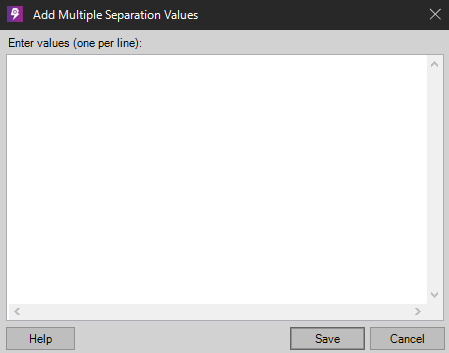
Adding Multiple Separation Values
Allows users to enter multiple separation values at once (copy + paste for example) with each new value on a new line.
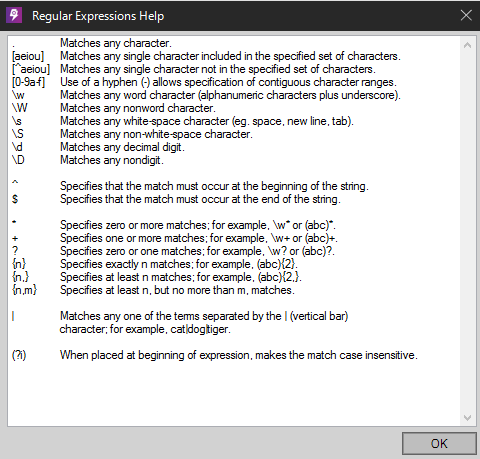
Pattern Matching Help
Basic help dialog containing a examples for pattern matching using Regular Expressions
Zone to Search
The <Entire Page>is the default or the user can select a zone that was previously defined or select “Define Zones.”
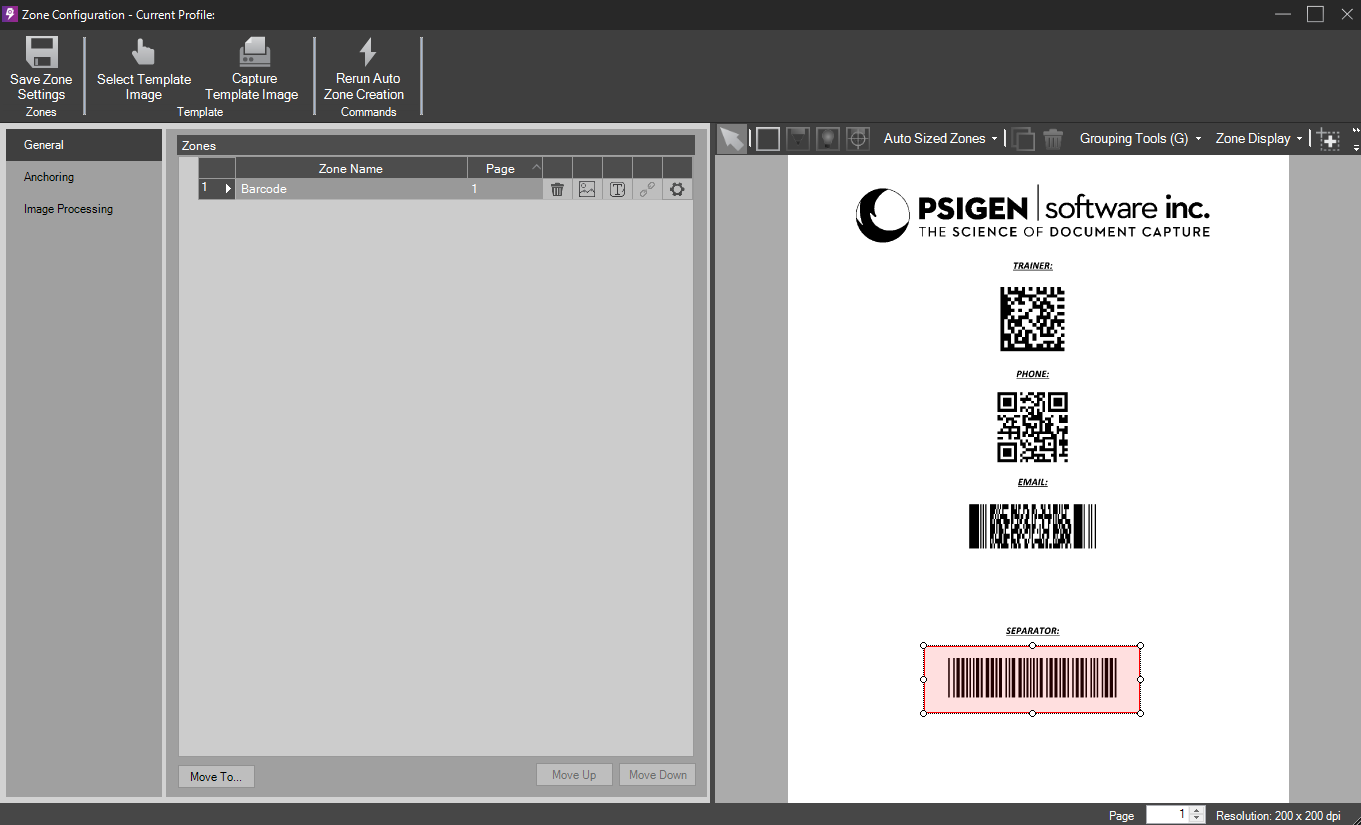
Define Zones
Select this to define a new zone. Zoom in to the desired area leaving room to maneuver. Then select the draw zones Icon and draw the zone.

Name the zone and fill out which page of the document it is expected to be found on. The Zone Names are kept in a list for use anywhere in the program that the user can Define Zones. NOTE: The Page of the template and its Resolution is displayed at the bottom of the screen and they MUST match the page and resolution at capture time.
 - Delete the highlighted unwanted zone. Note: If a Zone is in use by any Document Type, the zone cannot be deleted.
![]() - Apply image processing to the zone template image.
- Apply image processing to the zone template image.
![]() - Preview OCR/ICR results on printed/handwritten text in the selected zone.
- Preview OCR/ICR results on printed/handwritten text in the selected zone.
 - Ungroup a cluster of child zones contained within the selected zone (child zones are used for OMR purposes).
 - This pulls up more OCR options like enabling OCR logical context filtering or enabling OCR Trigram mode.
Populate Folder Separator
Value With Choose from the Entire Separator Value, Matching Words Only, and the Matching Word only with custom format.
Zone Configuration
The Icons at the top of the above screen allow the user to: Select a template image, save the template with zones, point, manually draw zones, select predefined zones, copy zones, delete zones, group zones, select an area to zoom, zoom in and zoom out.
Zone Anchoring Configuration
Choose from the following anchor types:
- Default (Top Left of Page)
- Barcode
- Patch Code
- Zone OCR Expression
- Precision OMR Timing Tracks
NOTE: If the user uses a barcode or patch code the type and pattern selected must be on the selected and match.
Other configuration options are listed below. NOTE: Availability depends on anchor type.
- Page Image to use for Anchoring - Select between Main, Original, or Alternate Image.
- Alternate Image Tag - Enter the tag name to be associated with the alternate image.
- Barcode/Patch Code Type - Select between various supported types of barcodes or patch codes.
- Barcode Pattern - Enter barcode value for the barcode intended to use for anchoring.
- Patch Code Number - Set Nth patch code on the page intended to use for anchoring. 
- Zone OCR Text - Enter specific text for OCR to detect.
- Zone To Search Anchor For - Drop down menu will list entire page and names of various zones previously defined.
- Preview Recognition Language - Use for Zone OCR purposes, drop down menu lists various supported languages.
PDF Bookmarking Options
Additionally, the user can choose to separate on a specific bookmark level. For instance, if a PDF has multiple bookmarks and child bookmarks they can choose to separate only on a child level vs the top level.

Trigger
A trigger is used to activate a separation profile.
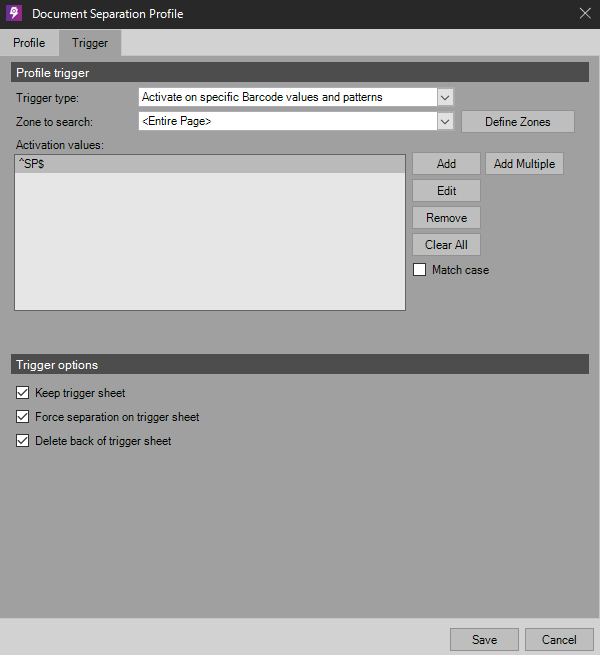
The trigger types available are:
- No Separation Trigger –Nothing will activate this profile.
- Activate on Any Barcode – Any barcode read will cause activation of this profile.
- Activate on specific Barcode values and patterns – Regular expressions can be used to create a desired pattern. If a barcode is read and matches the pattern activation of this profile will occur.
- Activate on any Patch Code – Any patch code will cause activation of this profile.
- Activate on a specific Patch Code – Choose from patch code types I, II, III, IV, VI, or T to activate this profile.
- Activate on new file (Import Only) – Any new file will cause activation of this profile.
- Activate when child folder N of selected directory changes (Import Only) – Activation occurs when the Nth child folder changes. Example: Set N to 3 if the desired pages for the document are in the third folder level down C:\A007-19D\C57183\A\1.tif, C:\A007-19D\C57183\A\2.tif etc.
- Activate on specific Zone OCR/ICR values and patterns - Detecting a user defined word in a Zone or the Entire Page will activate a separation profile.
- Activate on specific PDF Bookmark values or patterns - Detecting a specific PDF bookmark will activate the separation profile.
- Activate by script – use a script cause activation of this profile.
Triggers are used to switch between active separation profiles. Once a profile is activated it will remain active until another trigger is found.
- Keep Trigger Sheet – Allows the user to decide to keep or discard the page containing the trigger event.
- Force Separation on Trigger Sheet – Use this option if the user wants to force separation on trigger sheets. One example of where this option might be used is when switching to a barcode separation method and the user doesn’t want to place a barcode sheet immediately after a trigger barcode sheet.
- Delete back of Trigger Sheet - Delete the back of a duplex trigger sheet. Trigger sheets, like any document, can be single or duplex. When scanning in duplex mode, the user can chose to delete the back of the separator sheet.
NOTE: Blank page detection must be enabled.
PDF Bookmarking Options
Additionally, the user can choose to separate on a specific bookmark level. For instance, if a PDF has multiple bookmarks and child bookmarks they can choose to separate only on a child level vs the top level.
Comments
Article is closed for comments.