Introduction
Data File Indexing is a feature that allows users to import a Text (*.txt) or Comma Separated Value (*.csv) file using manual import or AutoImport and have the images and index data referenced in the file automatically processed. Imagine that each line of a text file is a row in a database, and in that row you have index field values and a path to an image. Data File Indexing can pick up all that information and do all of the work for you, as long as you have the document type properly configured.
Data File Indexing is a powerful tool. It allows you to utilize a single file to import and index many files from many locations all at once, without requiring user interaction. You can use additional product features, such as Database Lookup, or Auto Import, in conjunction with the auto processing of the text file, making this feature even more powerful.
Configuration Steps
- In your document type configuration, go to step 5 - Index
- Create a field for each value/column you intend to pull from the text file
- Move forward to step 6, Advanced Indexing
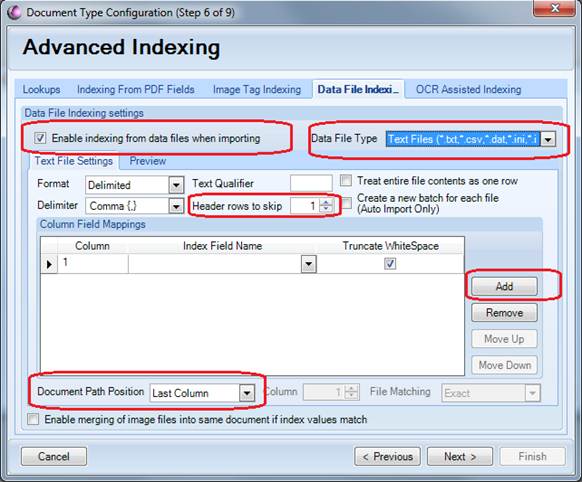
- Select the Data File Indexing tab
- Check the Enable Indexing Data Files when Importing checkbox
- Select the proper file format from the Data File Type dropdown
- Configure the options on the Text File Settings tab to match up with your file format
- If the first line of your text file is a list of column names rather than actual values, select 1 for the Header Rows to Skip value.
- In the Column Field Mappings section, click the ADD button to add new columns. You must have a column for every “column” in the text file – with the exception of the final column if it is the column that stores the document path.
- Example: If your text file has 18 columns, and column 18 is your document path, you need to add 17 columns. This is true even if you only wish to pull index data from 5 of those 18 columns.
- For each column you add, you must select the appropriate Index Field Name you want to map the data from that column into. It is not required that map a field, but if you don’t the data in that numbered column will be ignored.
- Configure the Document Path Position for the proper setting according to your text file
- Click on the Preview Tab to preview your file and make sure the mapping is correct.
- Save your document type
Testing Steps
- Go to the Capture / Import Module
- Import your text file by selecting it while the Import Module is active and clicking the Scan button
- If everything is configured correctly, you should now have imported all of the images from your text file with the corresponding index data pre-populated.
Comments
Please sign in to leave a comment.