| version 11.3.x | Download Pending |
Audience
This article is intended for PSIsafe Administrators.
Overview
The PSIsafe PDF Forms Monitor routinely watches a designated MS SQL database table using a service. When new rows with the designated status are found, a PSIsafe PDF Form is created using the data in that row. The PDF Form is then merged into PSIsafe based on specific data in the row that is matched to PSIsafe Folder Indexes (determined in Cabinet setup). Alternatively, if no matching folder is found, the data is used to populate the indices of a new folder, and the PDF Form is merged there instead. The data from the data table is matched to the Form fields, and the form is then populated with the data from the monitored table. All-in-all, the PDF Forms Monitor allows customized forms to be created based on the corresponding SQL Table Data, automating a variety of tasks and allowing employees at your organization to focus on other work.
Important Notes
- When adding new PSIsafe databases to be monitored, the service must be restarted.
- If the Debug variable in the service app.config file is changed, the service must be restarted for it to take effect.
- If the Debug variable in the administration interface app.config file is changed, the service must be restarted for it to take effect.
Prerequisites
- PSIsafe 32-bit Server and Client v. 11.x+
- SQL Administrator Permissions (Credentials) as well as a modifiable SQL DB
- PSIsafe Management PDF Forms Template configured and setup with linked indices
- PDF Form(s) for monitoring
Installation
- Contact PSIGEN Support to receive a link for the latest download of PDF Forms Monitor.
- Run the PDFFormsMonitorSetup.msi. This should be installed on the same machine that already has the PSIsafe 32-bit Server and Client installed.
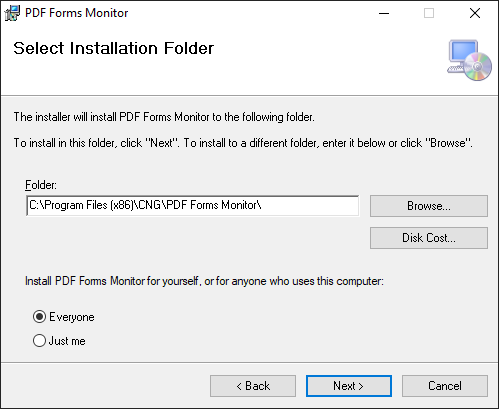
- Specify an installation path if different from the default. Make sure to note the changed installation path if applicable.
- Open Services.msc and ensure that the Cabinet PDF Forms Monitor service is started. It should be started and set to "Automatic" startup by default.
- Setup a PSIsafe user account that is dedicated to running PDF Forms Monitor. Several configuration elements should be in place for this user to fulfill their role properly:
- The user account needs to be designated as a ‘Cabinet Administrator’ for any cabinets which they will be affecting.
- The user account should be using a "Regular Full" license if possible, since interruptions to the service can be caused if any "Concurrent Full" licenses are not available in the given pool at the time that the service requests a login.
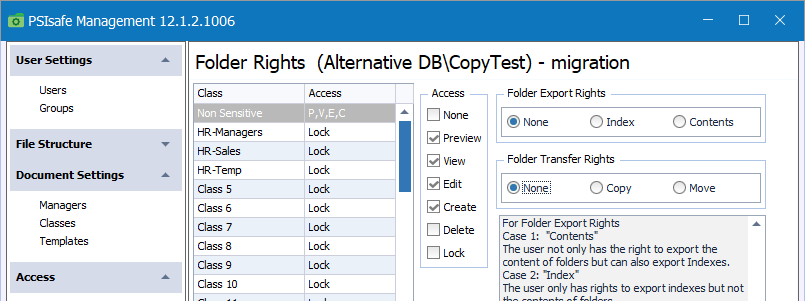
- The user account should be given full permissions up to "Create" for the affected cabinets to ensure the account can create and modify PDF Forms as needed. Ensure that each security class is accounted for in these permissions. The following is a minimum permissions example:
Database Preparation
In order to process rows from an SQL table, some method of entering data into the table must already exist. This could be a stand-alone program or some type of Web form. The table must have the following columns:
- A Unique Identifier of some type, such that no two rows will have the same value in this column.
- A migration column that indicates which rows have been processed. This must be an integer value. PSIsafe PDF Forms Monitor will search for one value (the “Get Value”) in this column that indicates unprocessed rows. Upon processing the row, this value will be changed to the “Update Value.” These two values must be different. For example, a 1 may specify a "Get Value" to update, and a 2 may specify a "Updated Value" signaling that the update has completed.
- A column that uniquely identifies a folder in the destination cabinet. It must match the folder index precisely or a new folder will be created.
- There should also be columns that can be used to create folder index values and to fill in form fields.
- Optionally, the table can also have a condition column, which is used to limit processing to a subset of the records matching the “Get Value” of the migration column.
- Other optional columns are ones indicating:
- A PSIsafe user or group to route a form to via workflow after creation
- Folder and document security classes to apply to the document or folder
- Other optional columns are ones indicating:
Main Screen
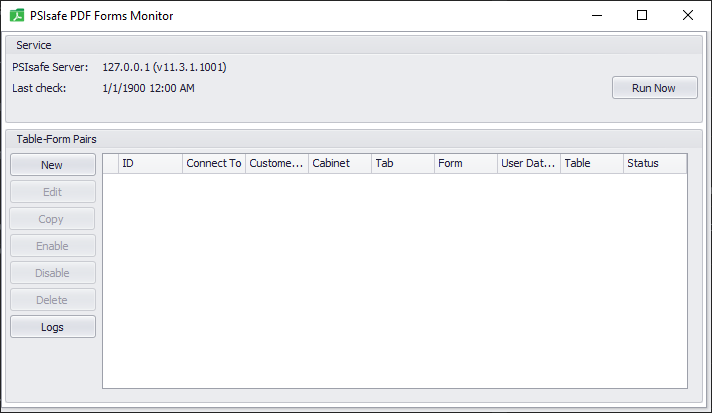
After logging in using the user name setup earlier, the below screen will appear. Opening the PSIsafe PDF Forms Monitor client suspends the service from running while the user makes changes. Upon first login and initial configuration, the screen will be blank, like so:
After creating a Table-Form Pair during the following steps, the created pairs will be displayed like so:

This screen shows the following:
- Last check – last time the service ran
- PSIsafe Server / Version – the name or IP address of the PSIsafe Server / the PSIsafe PDF Forms Monitor version number
- A list of currently defined Table to Form mappings (Table-Form Pairs)
It also contains the following controls:
- New – Define a new Table-Form Pair
- Edit – Edit an existing Table-Form Pair
- Copy – Copy an existing Table-Form Pair
- Enable – Allow the selected pair to be processed by the service
- Disable – Prevent the selected pair from being processed by the service
- Delete – Remove the pair completely
- Logs – Open the logs for the PDF Forms Monitor
Creating/Editing a Table-Form Pair
Creating and editing a pair steps through the same screens. In the case of creating a new pair, no information will be pre-filled. If editing, the current settings for the pair will be displayed. The user may cancel at any time, but all information/changes will be lost.
Step 1: Select Database Table
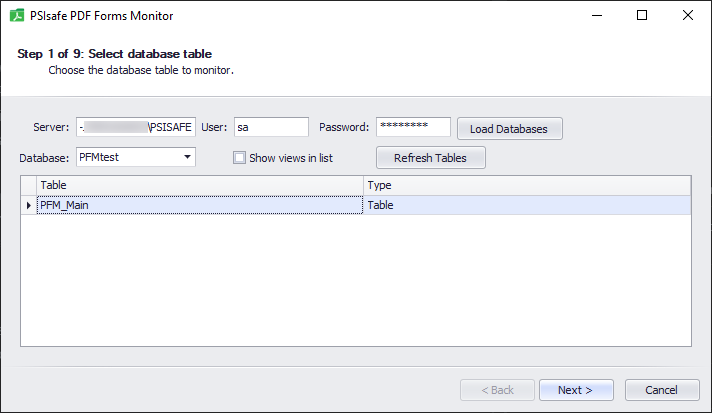
Select the database you want the form to pick up data from by filling in the connection/credentials information. Then select the table to read data from in the list. Click Next to proceed to step 2.
Step 2: Setup Table Migration
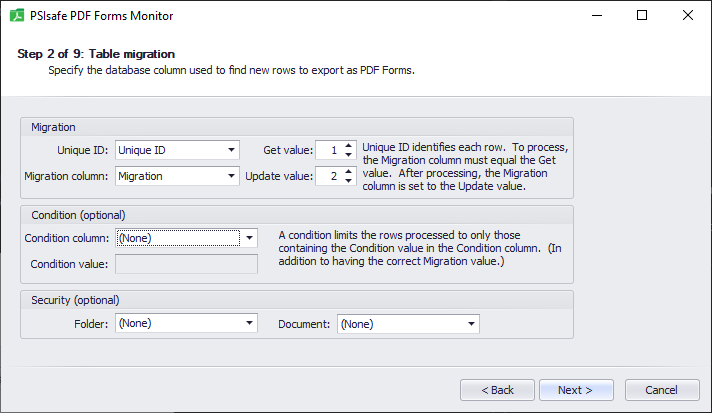
Any table to be monitored must have a single column that is unique to each row. Select it as the Unique ID. The Migration column is used to track which rows have been processed by PDF Forms Monitor and which have not. This column must be of the ‘Int’ data type. An example of this setup is in the screenshot below:

The Get value specifies the rows that should be regarded as unprocessed. The Update value is what the Migration column value will be changed to after processing by PDF Forms Monitor. These two values must be different.
In addition, the user may optionally check for a specific value in a second column called the Condition column. If this column and a value are specified, only those rows matching both the Get value in the Migration column and the Condition value in the Condition column will be processed by PDF Forms Monitor for this configuration.
The security section allows for the selection of a database column that will be used to set either or both the folder security class and document security class. This class should match a class name defined in PSIsafe Management > Document Settings > Classes.
After selecting the values, click next to proceed to step 3.
Step 3: Select PSIsafe Destination
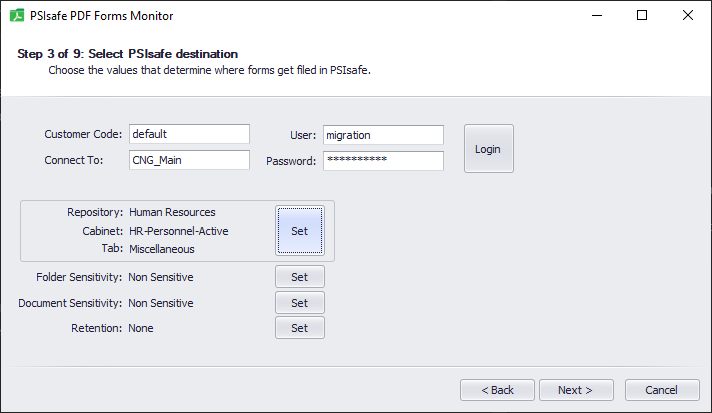
This step defines the cabinet to which the form will be created and filed. Enter the user name and password for the PSIsafe User with the proper permissions. Ensure this user has create rights to the cabinet defined.
Step 4: PSIsafe/Database match up
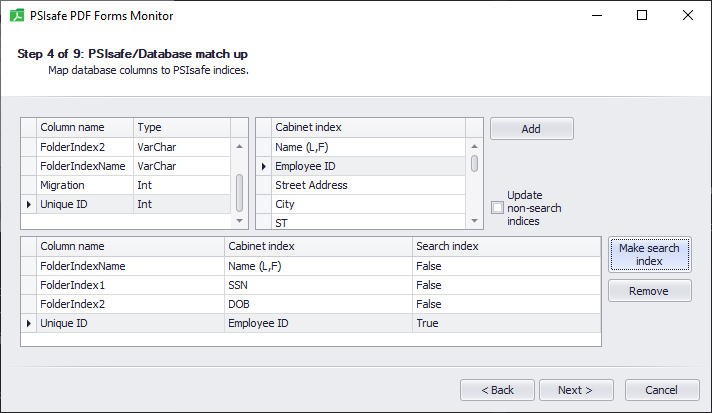
This step allows for mapping of fields in the data table being monitored to the cabinet folder indexes for the cabinet selected in step 3. The data table fields appear in the top left grid and the cabinet folder indexes appear in the top right grid. The bottom grid shows the results of the fields mapped from the data table to the folder indexes.
To map a field to an index, click the data column name and then click the corresponding cabinet index. Click ‘Add’ to complete the mapping. Once the fields are mapped, select the row in the bottom grid that will be used as the unique index in cabinet and then click ‘Make Search Index’.
Step 5: Select form
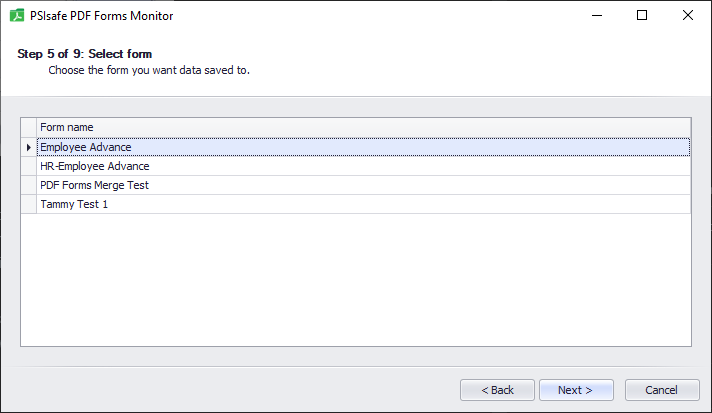
In this step, select the cabinet form template that will be populated with data from the data table and created in PSIsafe. Simply click the desired template and then click ‘Next’ to proceed.
Important Notes:
- The PDF Forms listed on step 5 correspond to PSIsafe Templates that are configured as PDF Forms (electronic forms type under Manager).
- The PDF Form Template and corresponding linked indexes must be pre-configured.
For more information on configuring PDF Forms, see:
PSIsafe Administrator Guide: Templates: PDF Forms
Step 6: Form/Database Matchup
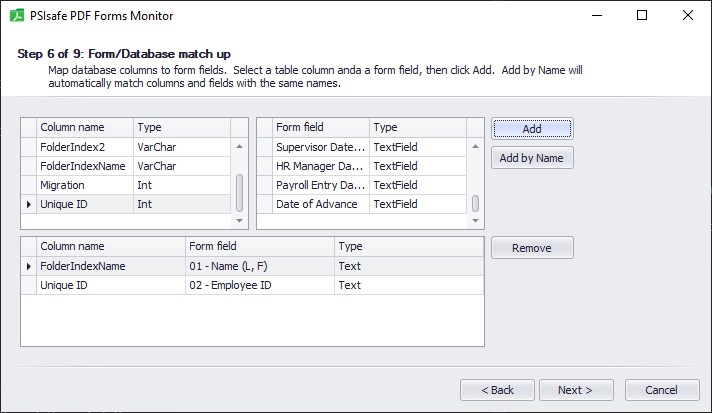
This step is used to map the data table fields to the form fields for population of the form. This works similar to the screen defined in step four (4). Click the data column name in the top left grid, then click the corresponding form field in the top right grid. Click ‘Add’ to map the fields to each other. The result of the mapping appears in the bottom grid.
Note: If the data column names are defined with the same names as the form fields, clicking the ‘Add by Name’ button will automatically map the data fields with the form fields. This can save a great deal of time in setting up the mappings. (This function is not case sensitive and will account for underscores and spaces)
Once all the data fields are mapped, click ‘Next’ to continue.
Step 7: Document Description
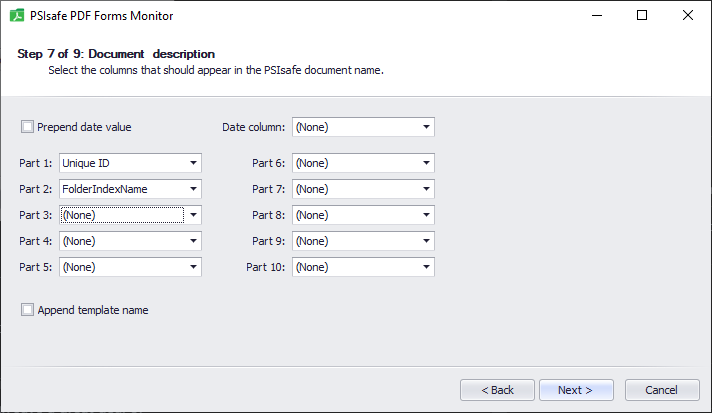
Select the data to be used to create the document name. Up to ten database columns can be used. In addition, a date column can be selected as the first column and the template name can be appended. At least one column must be selected to be applied to the document description. The description selected here will be the document title of the item when it is filed in PSIsafe. It will appear as the Document Title in the Document List of a Folder.
Step 8 Workflow (optional)
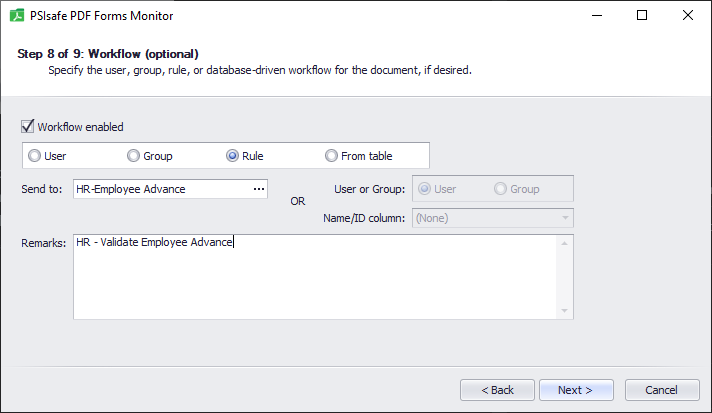
The newly created forms can be automatically routed using Workflow, if desired. They may be routed to a specific user or group, using a rule, or using data from the table.
Important Note: If a rule is selected, it must not have an initial condition requiring user input.
If information from the table is to be used, the column to be monitored must be specified. It may contain either a PSIsafe user/group name or an internal PSIsafe user/group database ID. It must also be specified whether the column contains users or groups.
All forms must therefore be routed to either users or groups; they cannot be conditionally routed to one or the other.
The remarks section will add a workflow note for each form routed and will appear in the workflow remarks section.
Step 9 Confirmation
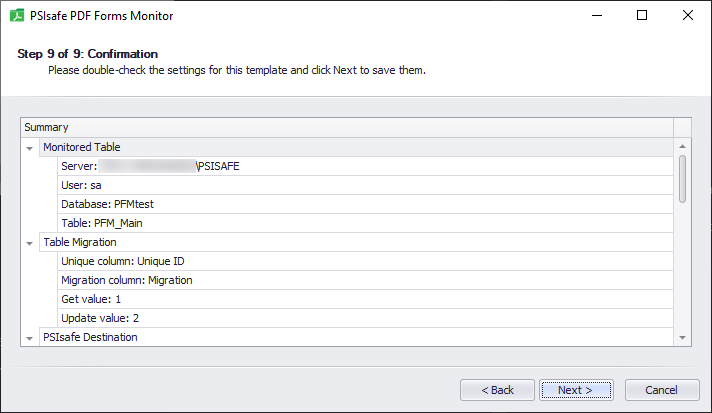
This screen lets the user double-check that the correct information was entered. A section corresponding to each of the previous screens maybe be expanded or collapsed to view the details. If an error is found, the Back button may be used to go back and correct it. Clicking Next on this screen will create the new Table-Form Pair or update the existing one.
After clicking ‘Next’ the template will be saved and the configuration is complete. Click ‘Finish’ on the final screen to go back to the main configuration page.
Finish

The final screen confirms creation or updating of the pair. Click Finish to return to the main screen. Upon creation, the Table-Form Pair is automatically enabled. However, because the service does not run while the form is open, you have the opportunity to disable it before any rows are processed.
Comments
Article is closed for comments.